


Kasten UI vs. Command Line
Kasten comes with an elegant and intuitive user interface that enables backup and application admins to perform their data protection tasks effortlessly. It is little known though that Kasten can also be fully operated from the command line with no need to access its UI. This unlocks the possibility of switching from a ClickOps to a GitOps approach, dear to many DevOps engineers and often mandated by organizations that adopt an “IaC first, automate all the things” kind of philosophy.
As a result, a backup solution like Kasten - built specifically for Kubernetes workloads – makes it possible to embed data protection policies deep into the lifecycle of applications. Imagine deploying apps with a backup policy already attached to them: without any need for “human interaction”, Kasten would take backups in the background and ship durable, encrypted and immutable Restore Points to a safe location. No mouse clicks involved.
How is all this possible?
Kasten is a Kubernetes application, deeply integrated with the cluster it protects. Once installed, Kasten augments the cluster’s set of available APIs adding new API and Custom Resources – these are indeed leveraged in the background each time a backup admin performs any activity within the Kasten UI.
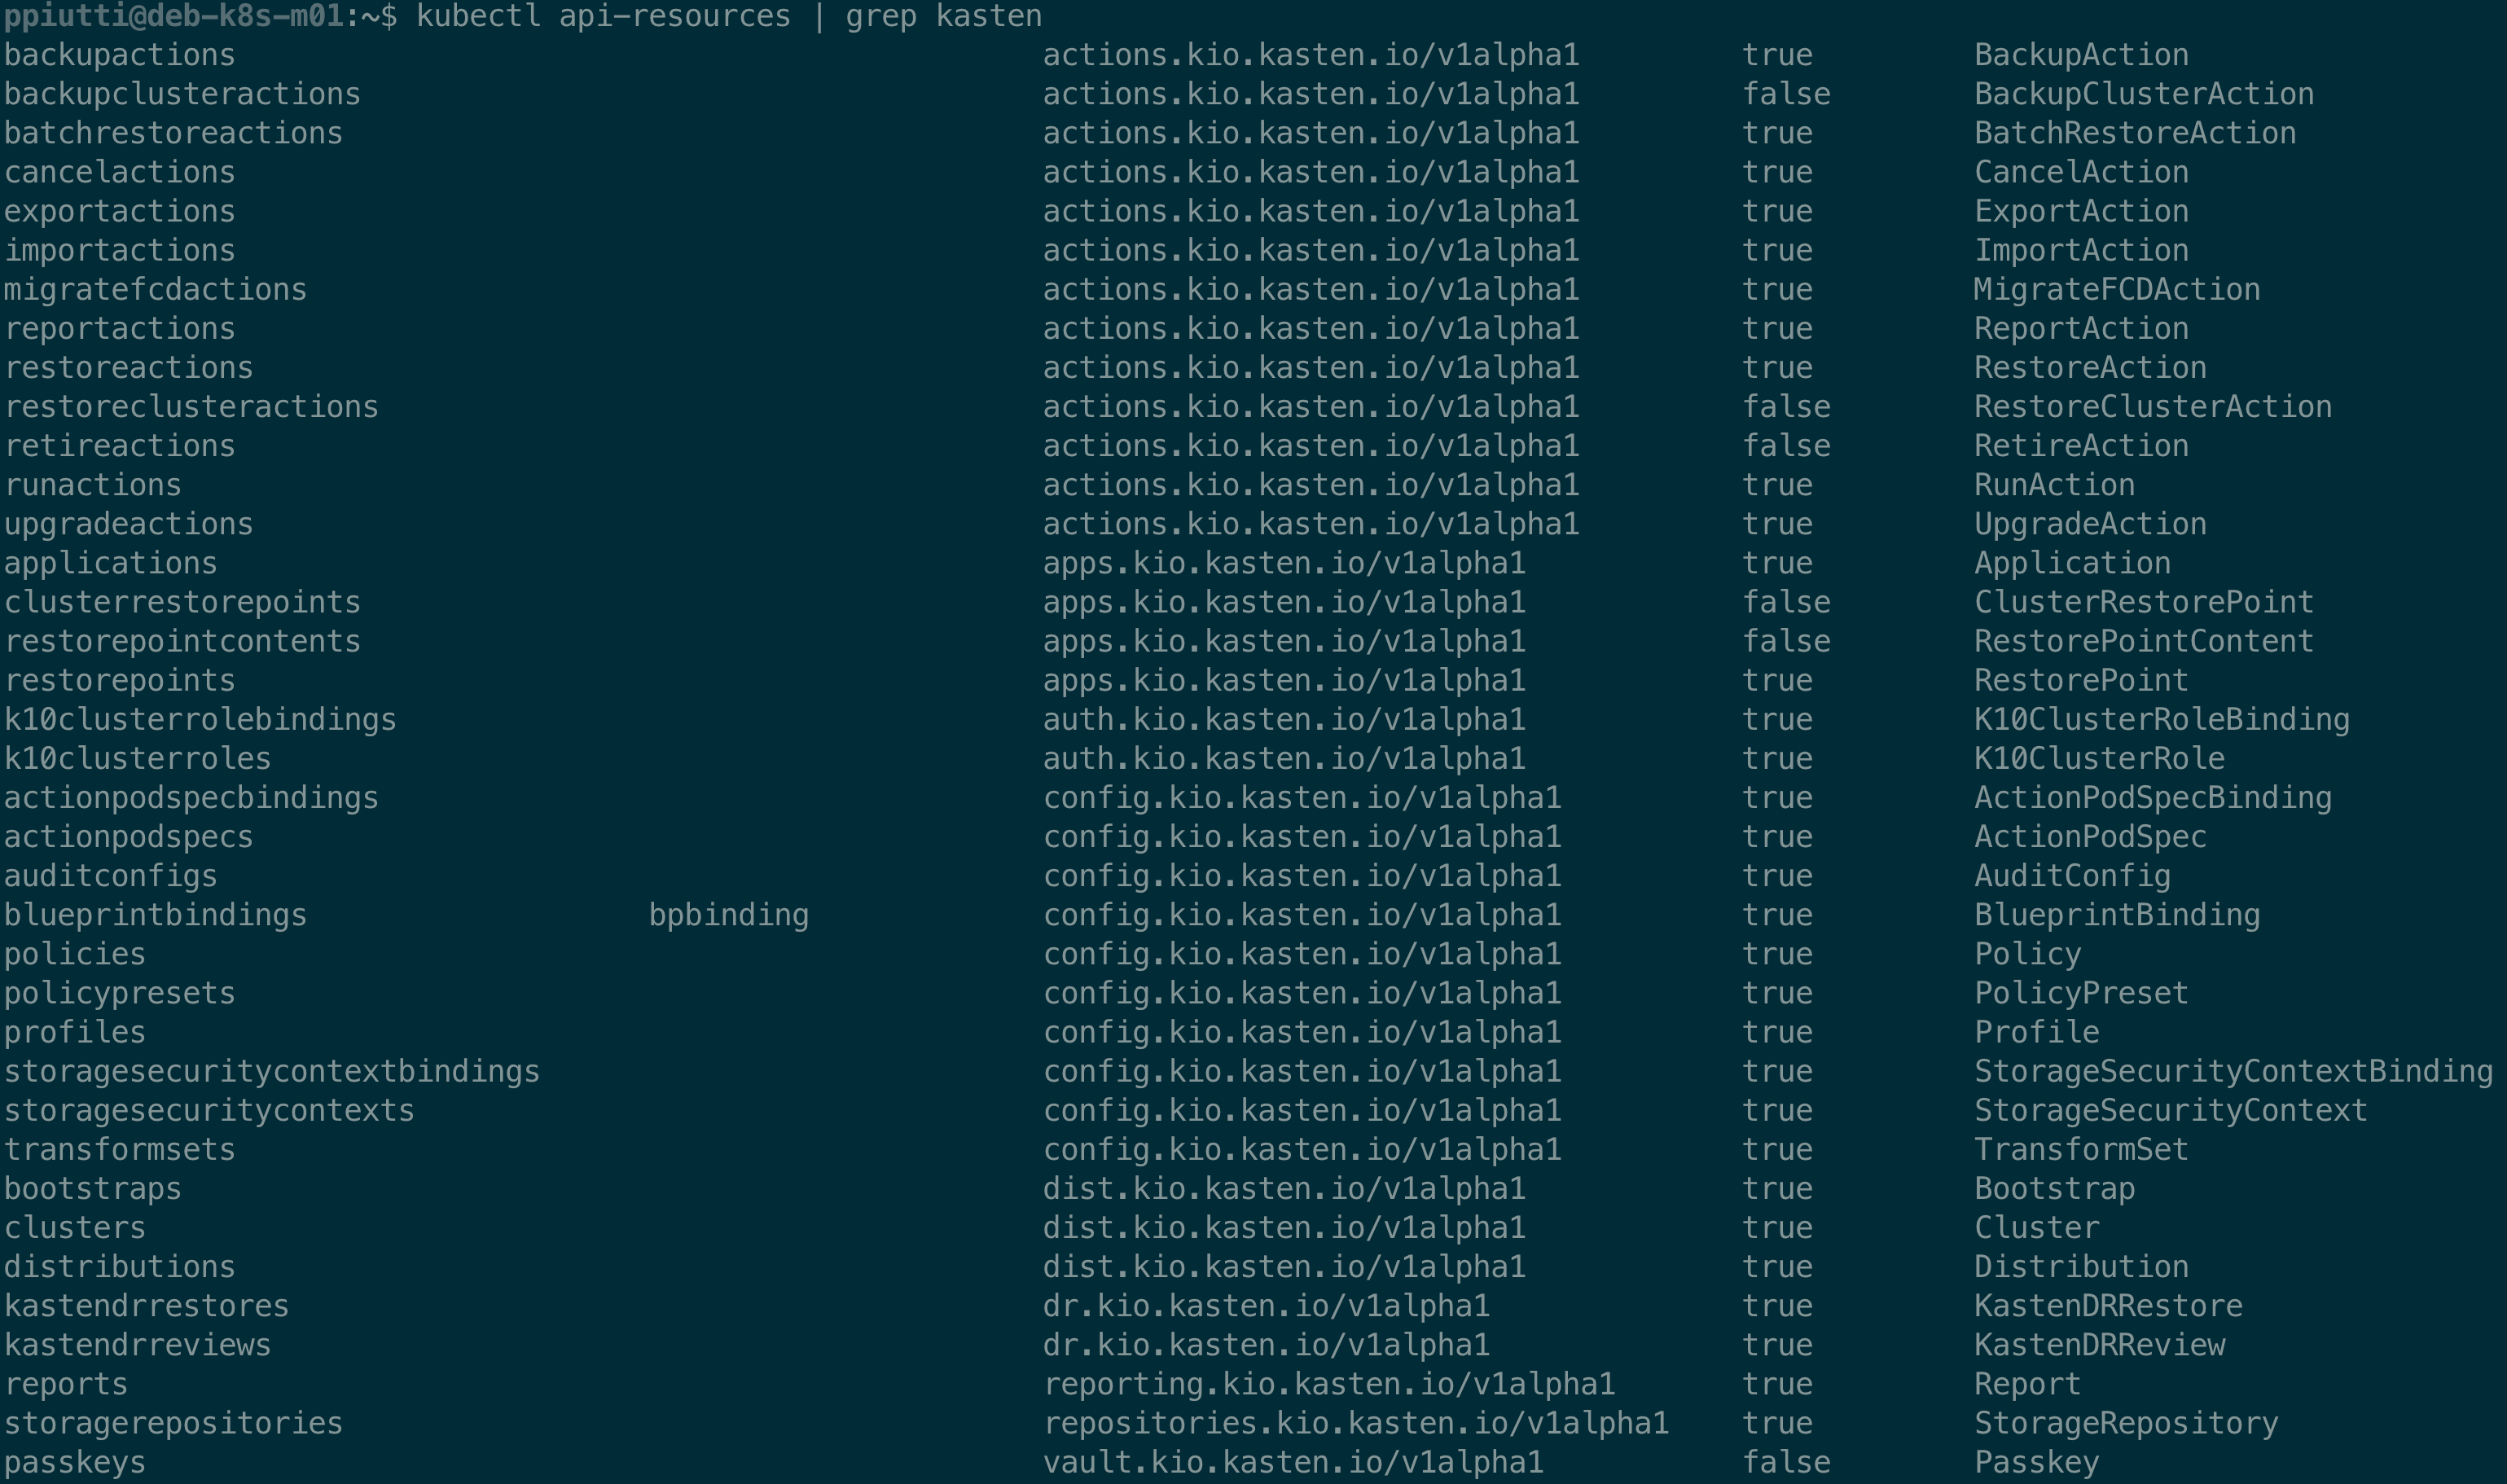
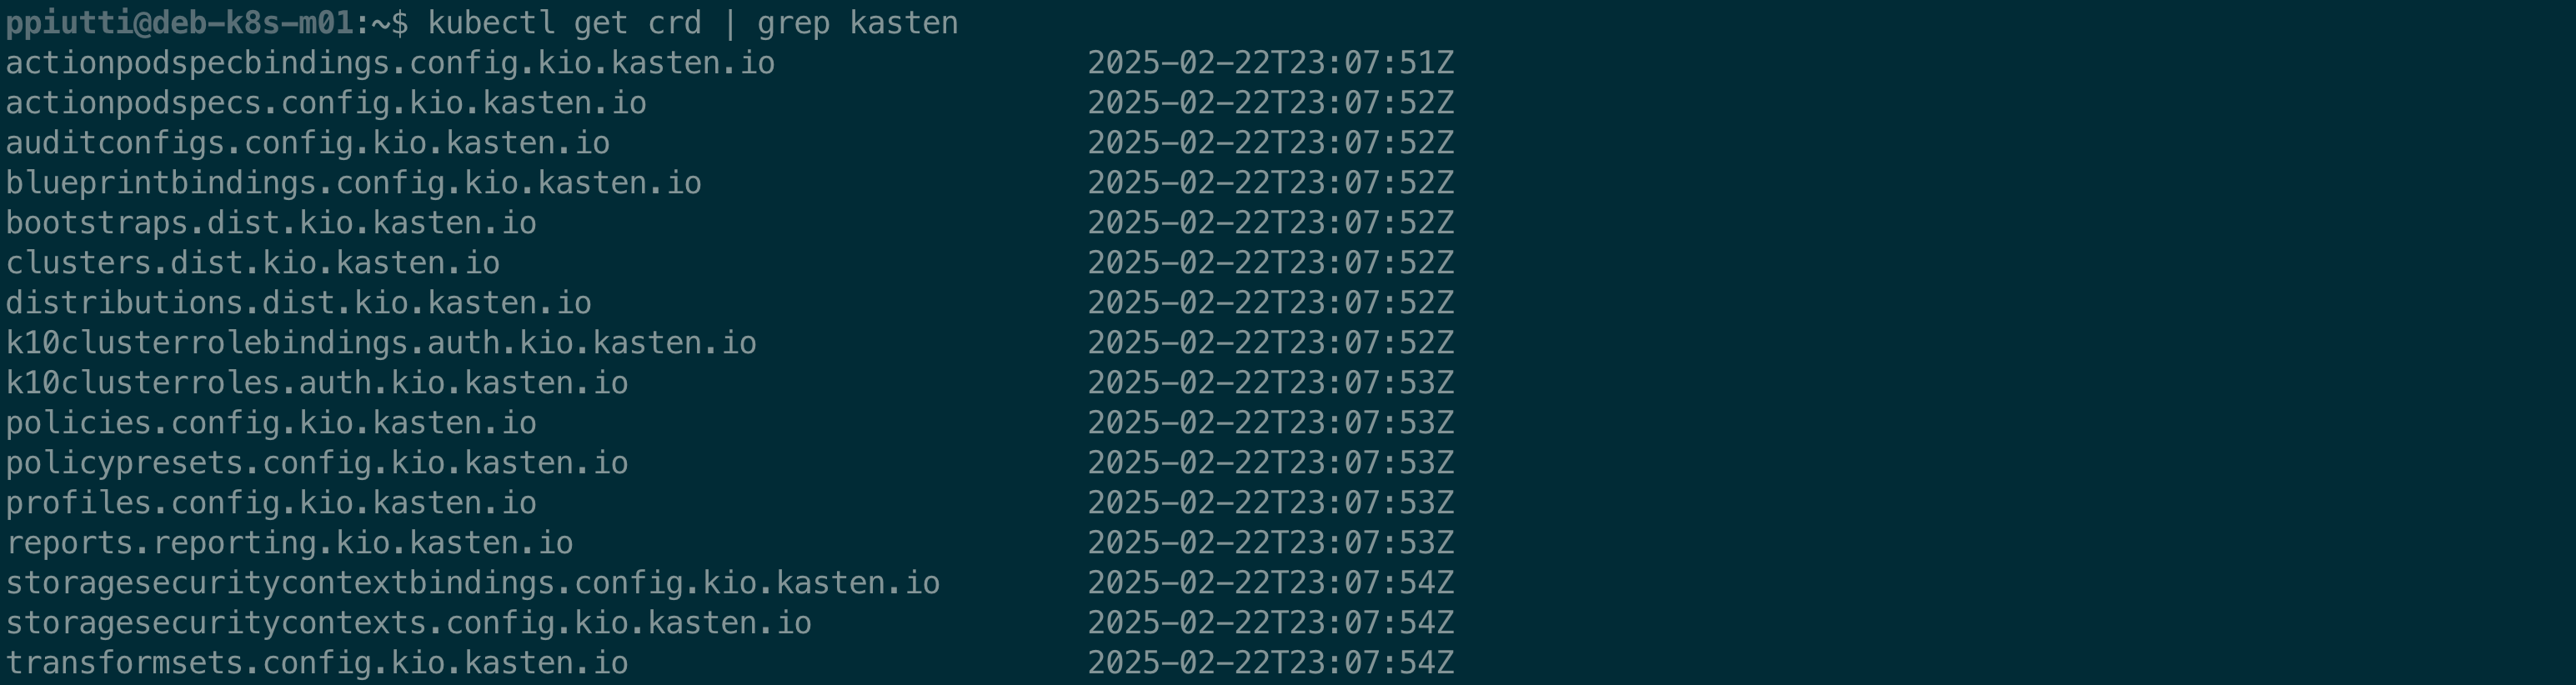
The list of the Kasten (and Kanister) resources added to a cluster can be obtained with the following commands:
$ kubectl api-resources | grep kasten
$ kubectl api-resources | grep kanister

$ kubectl get crd | grep kasten
$ kubectl get crd | grep kanister

Now that we had a glimpse at the possibilities offered by Kasten’s APIs, let’s put them to work.
Writing and applying a Backup Policy
In this first blogpost we will start with something basic: defining a backup policy, then taking a backup and restore from it, all from the command line. In follow-up posts we will cover more advanced tasks, such as DR scenarios or maintenance tasks.
A backup policy in Kasten is usually split in two halves: first we take a local snapshot of the application, including the persistent data associated to it, and then we export it to what we call a Location Profile. Such a profile is nothing else than a logical pointer to a backup repository external to your cluster. As of today, Kasten supports different type of storages for exports: AWS S3 Buckets, Azure Storage Buckets, Google Cloud Storage Buckets, Generic S3, NFS and Veeam Repositories. A pre-requisite to writing your backup policy is to have at least one location profile configured.
Configuring a location profile is a two-steps task: first we must create a secret with the credentials used to access the repository, then the profile itself with the “directions” to get to it.
Defining the Profile Secret
There are, of course, different kind of Secrets depending on how authentication is done to the target storage. Examples of how to craft different profile secrets for different kinds of external backup repositories are well detailed in our documentation.
In this example we are configuring a secret to access an S3 compatible bucket in Cubbit.io DS3 (a distributed S3 compatible object storage), but it could be anything like MinIO, Scality Artesca or any other self or cloud-hosted S3 service. The structure of the secret is very simple: the only things worth mentioning are specifying the type of secret (such as secrets.kanister.io/aws) and to include the bucket credentials in the .data section.
apiVersion: v1
kind: Secret
metadata:
  name: k10secret-ds3
  namespace: kasten-io
type: secrets.kanister.io/aws
data:
  aws_access_key_id: <Your Base64-Encoded Bucket Access Key ID>
  aws_secret_access_key: <Your Base64-Encoded Bucket Secret Key>
For any other type of supported storage, please refer to the above documentation – the logic to define them is the same - what must be adapted is mostly the type of secret and credentials required.
Just apply the YAML file to create the secret:

Once the secret is created, the Location Profile can be defined.
Defining the Location Profile
The Kasten Profile Custom Resource specifications allow to craft a Location Profile manifest file for any of the supported external storages. It is worth mentioning here, to avoid any possible confusion, that the Profile CR can be used not only to configure external storage (Location Profiles) but also infrastructure access for direct integration with supported providers (Infrastructure Profiles) such as VMware vSphere, Portworx, OpenStack, AWS etc. in conjunction with a matching secret type. Which one of the two kinds of Profiles we are declaring is specified in the .spec.type field (e.g. Location).
Infrastructure Profiles are outside the scope of this post and will eventually be covered in one of the coming ones.
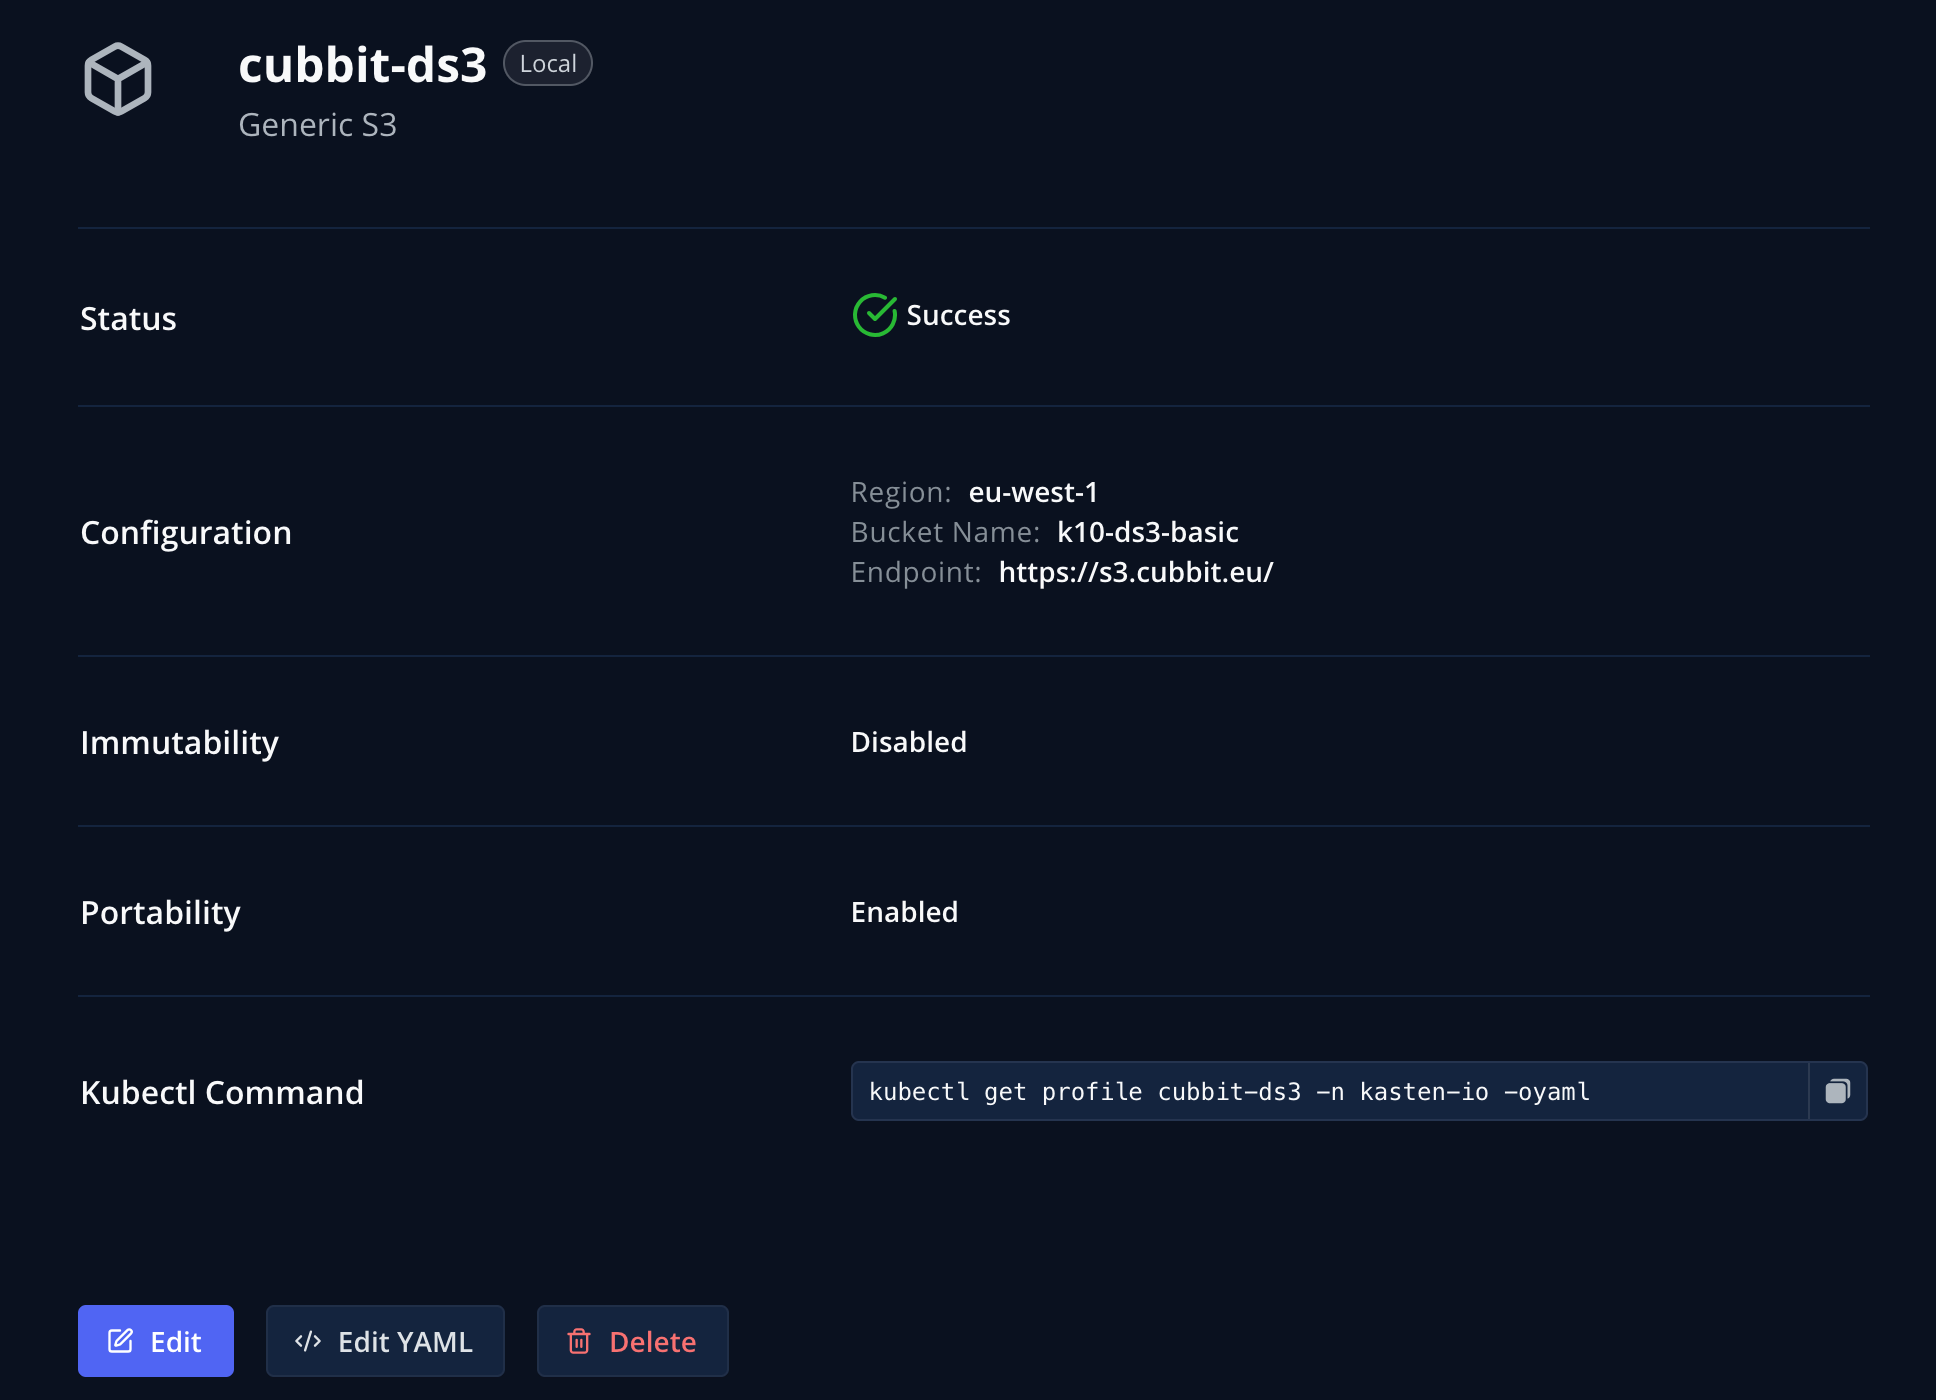
Here we are creating an Object Store Location Profile to connect to the Cubbit DS3 bucket hosted at https://s3.cubbit.eu/ in the eu-west-1 region.
We distinguish between the different types of external storage by specifying this in the .spec.locationSpec.type field. When type is ObjectStore like in our case, the .spec.locationSpec.objectStore stanza follows, where we specify the exact directions needed to reach the storage endpoint. Finally, to connect, we refer to the secret we created before in the .spec.locationSpec.credential section, and that is basically it.
See the full Profile API type specification for how to write Location Profile manifests for any other kind of supported external storage.
apiVersion: config.kio.kasten.io/v1alpha1
kind: Profile
metadata:
  name: cubbit-ds3
  namespace: kasten-io
spec:
  type: Location
  locationSpec:
    credential:
      secretType: AwsAccessKey
      secret:
          apiVersion: v1
          kind: secret
          name: k10secret-ds3
          namespace: kasten-io
    type: ObjectStore
    objectStore:
      name: k10-ds3-basic
      endpoint: https://s3.cubbit.eu/
      objectStoreType: S3
      region: eu-west-1
We can apply the YAML file:

And check the Location Profle is correctly validated:

Since seeing is believing, if we have a peek at the Kasten UI under Profiles > Location, the newly created Location Profile is there.
Try to click the “Edit YAML” button! Yes, you can extract directly from the UI the YAML file you just created by hand – this opens the possibility of using the UI for “easy templating” any kind of Kasten manifest file that can then be re-utilized in your IaC practices. Smart.
Time to move on and draft a backup policy.
Creating a Backup Policy
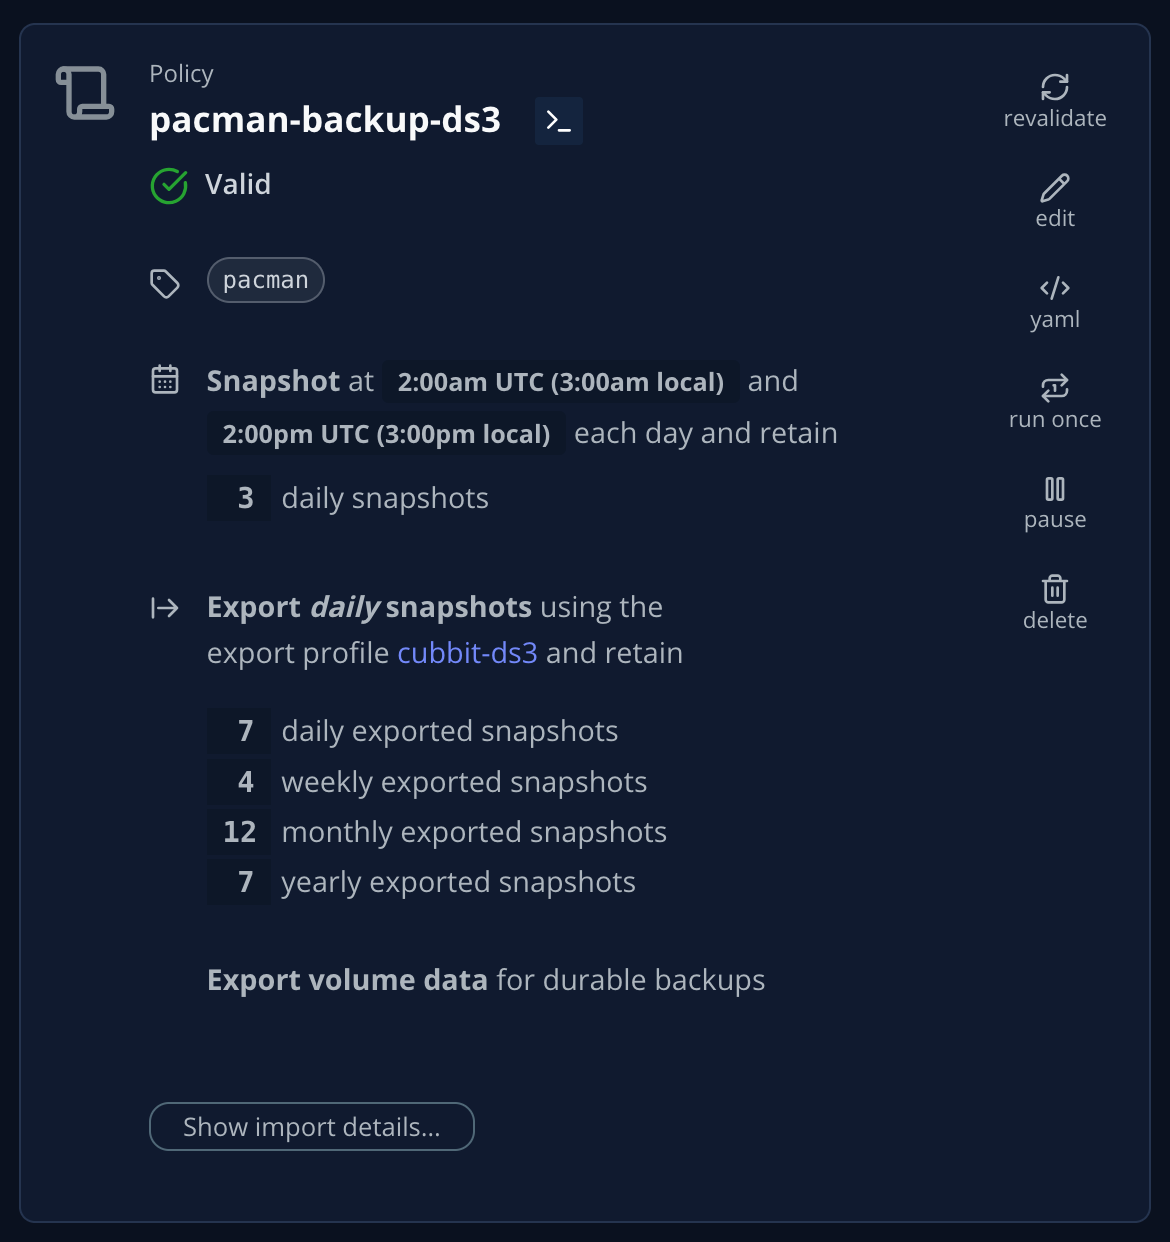
What we want to do now is to create a simple policy (pacman-backup-ds3) that takes a local snapshot of the app deployed in the pacman namespace twice a day (at 2:00am UTC and 2:00pm UTC), keeps the last three daily snapshots (so we can go back up to 24hrs and eventually use a local snapshot to restore), export the snapshot to our location profile as soon as it’s created and keep the exports on the external storage with a default GFS (Grandfather – Father – Son) retention policy.
We will keep the policy simple and will not investigate any of the advanced options available. The full specifications of the Kasten Policy API are available in the documentation, for further research.
apiVersion: config.kio.kasten.io/v1alpha1
kind: Policy
metadata:
  name: pacman-backup-ds3
  namespace: kasten-io
spec:
  comment: ""
  frequency: "@daily"
  paused: false
  actions:
    - action: backup
    - action: export
      exportParameters:
        frequency: "@daily"
        profile:
          name: cubbit-ds3
          namespace: kasten-io
        exportData:
          enabled: true
      retention:
        daily: 7
        weekly: 4
        monthly: 12
        yearly: 7
  subFrequency:
    minutes:
      - 0
    hours:
      - 2
      - 14
    weekdays:
      - 0 # no specific preference for any day of the week for weekly retention
    days:
      - 1 # for monthly retention, the snap taken at 2:00am UTC on the 1st day of each month will be retained
    months:
      - 1 # for yearly retention, the snap taken at 2:00am UTC on the 1st day of January will be retained
  retention:
    daily: 3
    weekly: 0
    monthly: 0
    yearly: 0
  selector:
    matchExpressions:
      - key: k10.kasten.io/appNamespace
        operator: In
        values:
          - pacman
The manifest is self-explanatory – the only thing that requires a bit of clarification is how the subFrequency settings work. If no subFrequencies are specified, standard frequencies for snapshots and exports are applied as per this logic:
-
Policies run once within the period of the frequency (e.g. @daily).
-
Hourly policies run at the top of the hour.
-
Daily policies run at midnight UTC.
-
Weekly policies run at midnight Sunday UTC.
-
Monthly policies run at midnight on the 1st of the month UTC.
-
Yearly policies run at midnight on the 1st of January UTC.
-
Snapshots and backups at those times are retained by the corresponding retention counts.
These settings are overridden when the subFrequency settings is specified. In our case we take two daily snapshots, one at 2:00 and another one at 14:00 UTC every day. Since “2” is the first item in the hours array, it’s the snaps taken at 2:00 that will always qualify for promotion to the weekly retention stage; having set “0” for weekdays means that we have no preference for which days of the week we want to retain weekly snaps or exports. Specifying “1” for days implies that only restore points created on the first day of the month will qualify for promotion to monthly; similarly, with a setting of “1” for months, only restore points created on Jan 1st every year graduate to be retained on a yearly basis.
With this now clear, let’s move on and apply the policy:

If we look at the policies in the UI, the policy resulting from our YAML manifest shows up correctly.
The policy will run automatically according to its scheduled frequency.
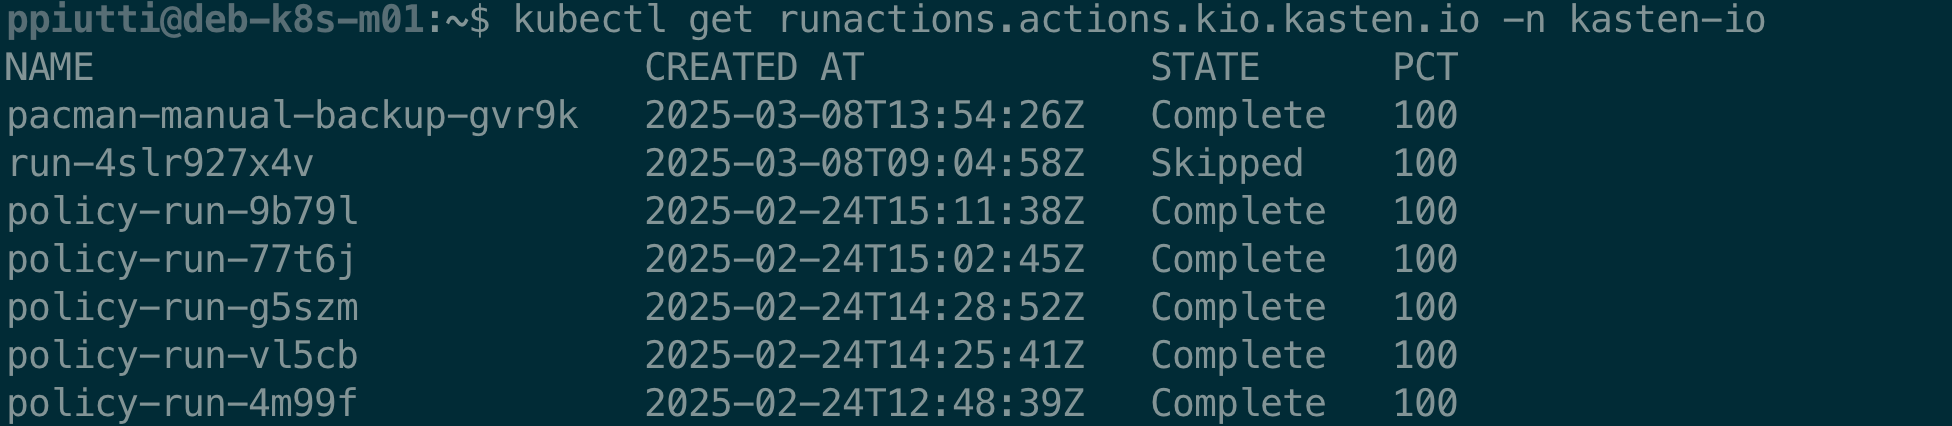
Policy runs are tracked and can be listed with the
$ kubectl get runactions.actions.kio.kasten.io -n kasten-io
command:
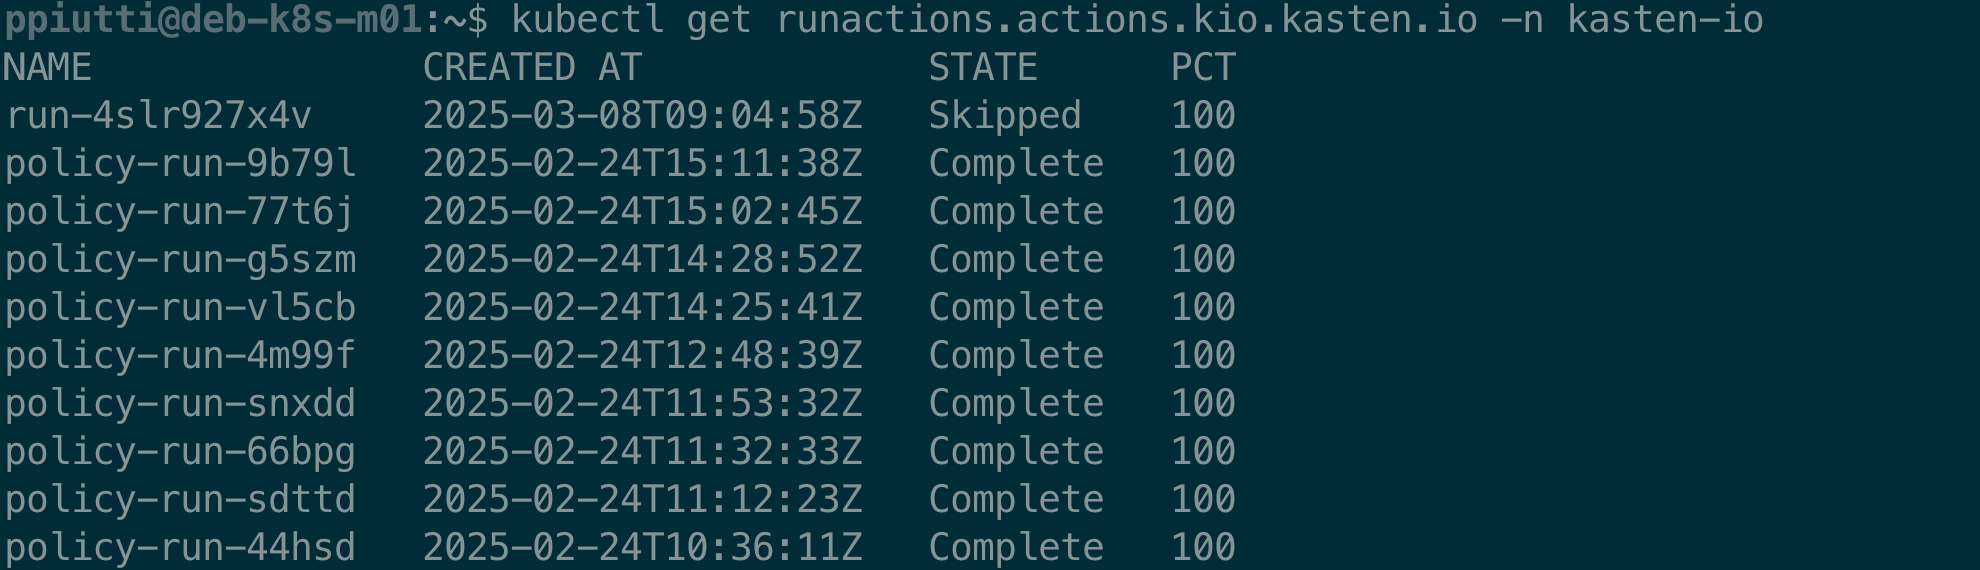
In the output there is no clear indication of the policy these actions are referred to, but there’s an easy workaround using custom columns:
$ kubectl get runactions.actions.kio.kasten.io -n kasten-io \
-o=custom-columns=\
'NAME:.metadata.name',\
'CREATED AT:.metadata.creationTimestamp',\
'STATE:.status.state',\
'PCT:.status.progress',\
'POLICY:.spec.subject.name'

From there of course it is possible to analyze in detail each policy run using the -o yaml option or going for a kubectl describe runactions… command instead.
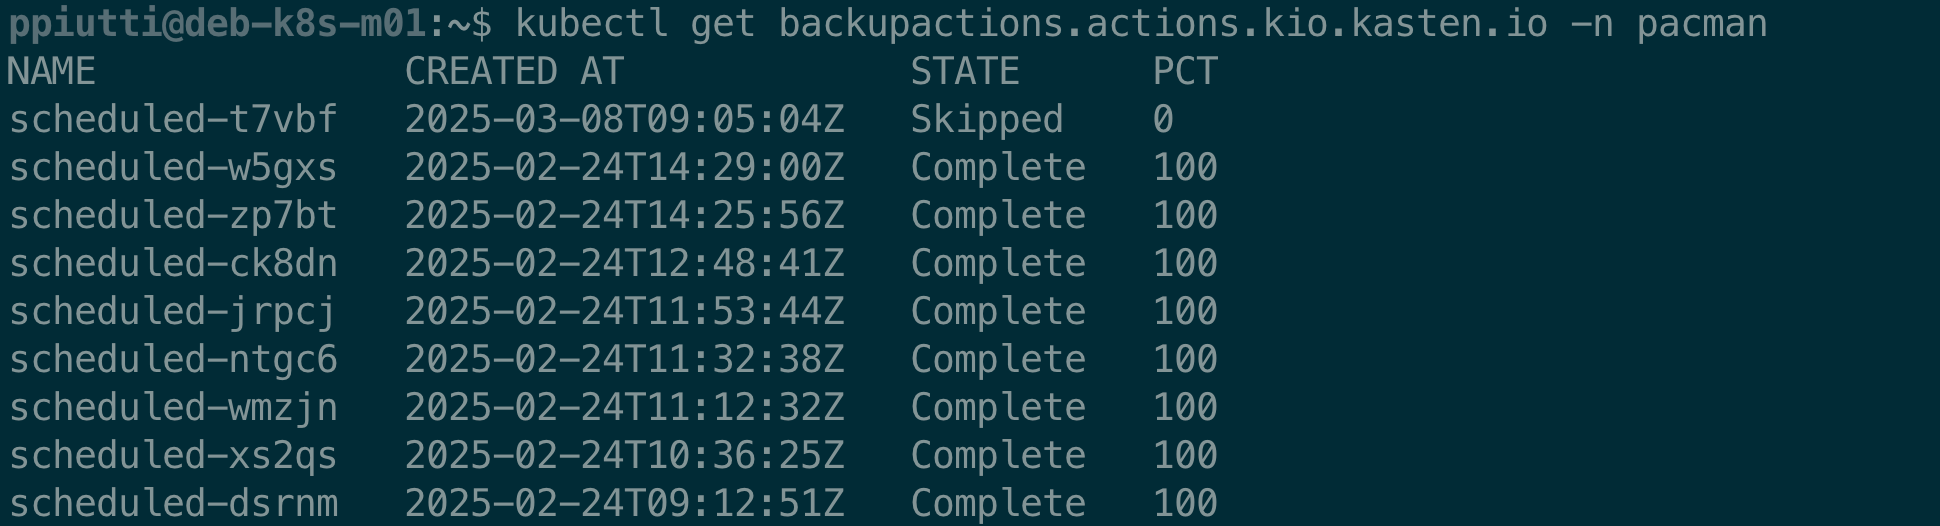
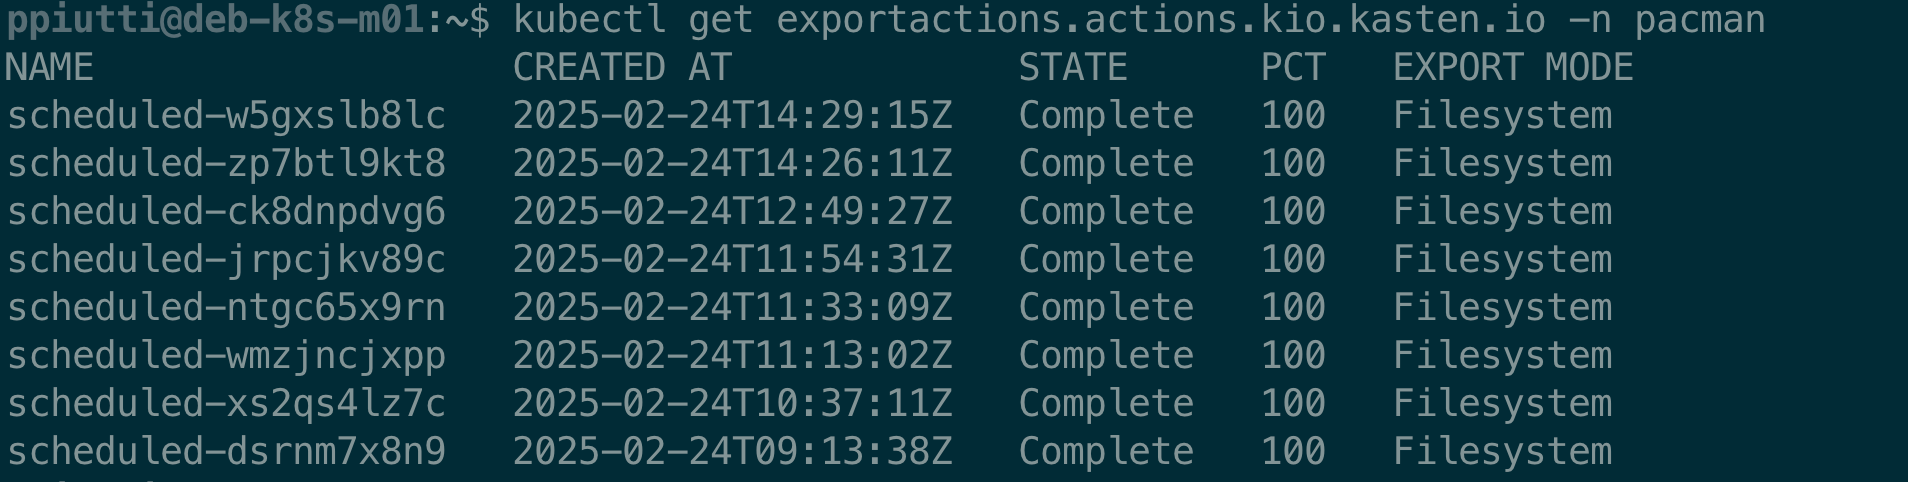
Since a backup policy implicitly executes a BackupAction and, eventually, also an ExportAction, it is possible to monitor the execution status of backups (snapshots) and exports associated to Policies with the
$ kubectl get backupactions.actions.kio.kasten.io -n <app-namespace>
$ kubectl get exportactions.actions.kio.kasten.io -n <app-namespace>
commands, to be executed inside the namespace where the application resides. Backup and Export Actions are namespaced and correlated to the application they protect:
Again, once identified the action we want to inspect, we can always use the -o yaml option or the kubectl describe runactions… command for more details.
But what if we want to run the policy on demand? This is when crafting and applying a RunAction manifest comes in.
Running Policies on demand with RunActions
We have just seen we can use the custom RunAction resource to monitor policy execution, but we can also use it to manually execute a policy. Let’s say we want to manually run the pacman-backup-ds3 policy created above. All we have to do is create a YAML file like below, where we indicate a custom header for the name of our RunActions (.metadata.generateName), and the details about the policy we are going to execute (under the .spec.subject section):
apiVersion: actions.kio.kasten.io/v1alpha1
kind: RunAction
metadata:
  generateName: pacman-manual-backup-
  namespace: pacman
spec:
  subject:
    kind: Policy
    name: pacman-backup-ds3
    namespace: pacman
Now we can apply the YAML and execute the policy:

Then we can monitor it in real time from the command line with the command:
kubectl get runactions.actions.kio.kasten.io <runaction> -n
kasten-io -ojsonpath="{.status.state}{'\n'}"
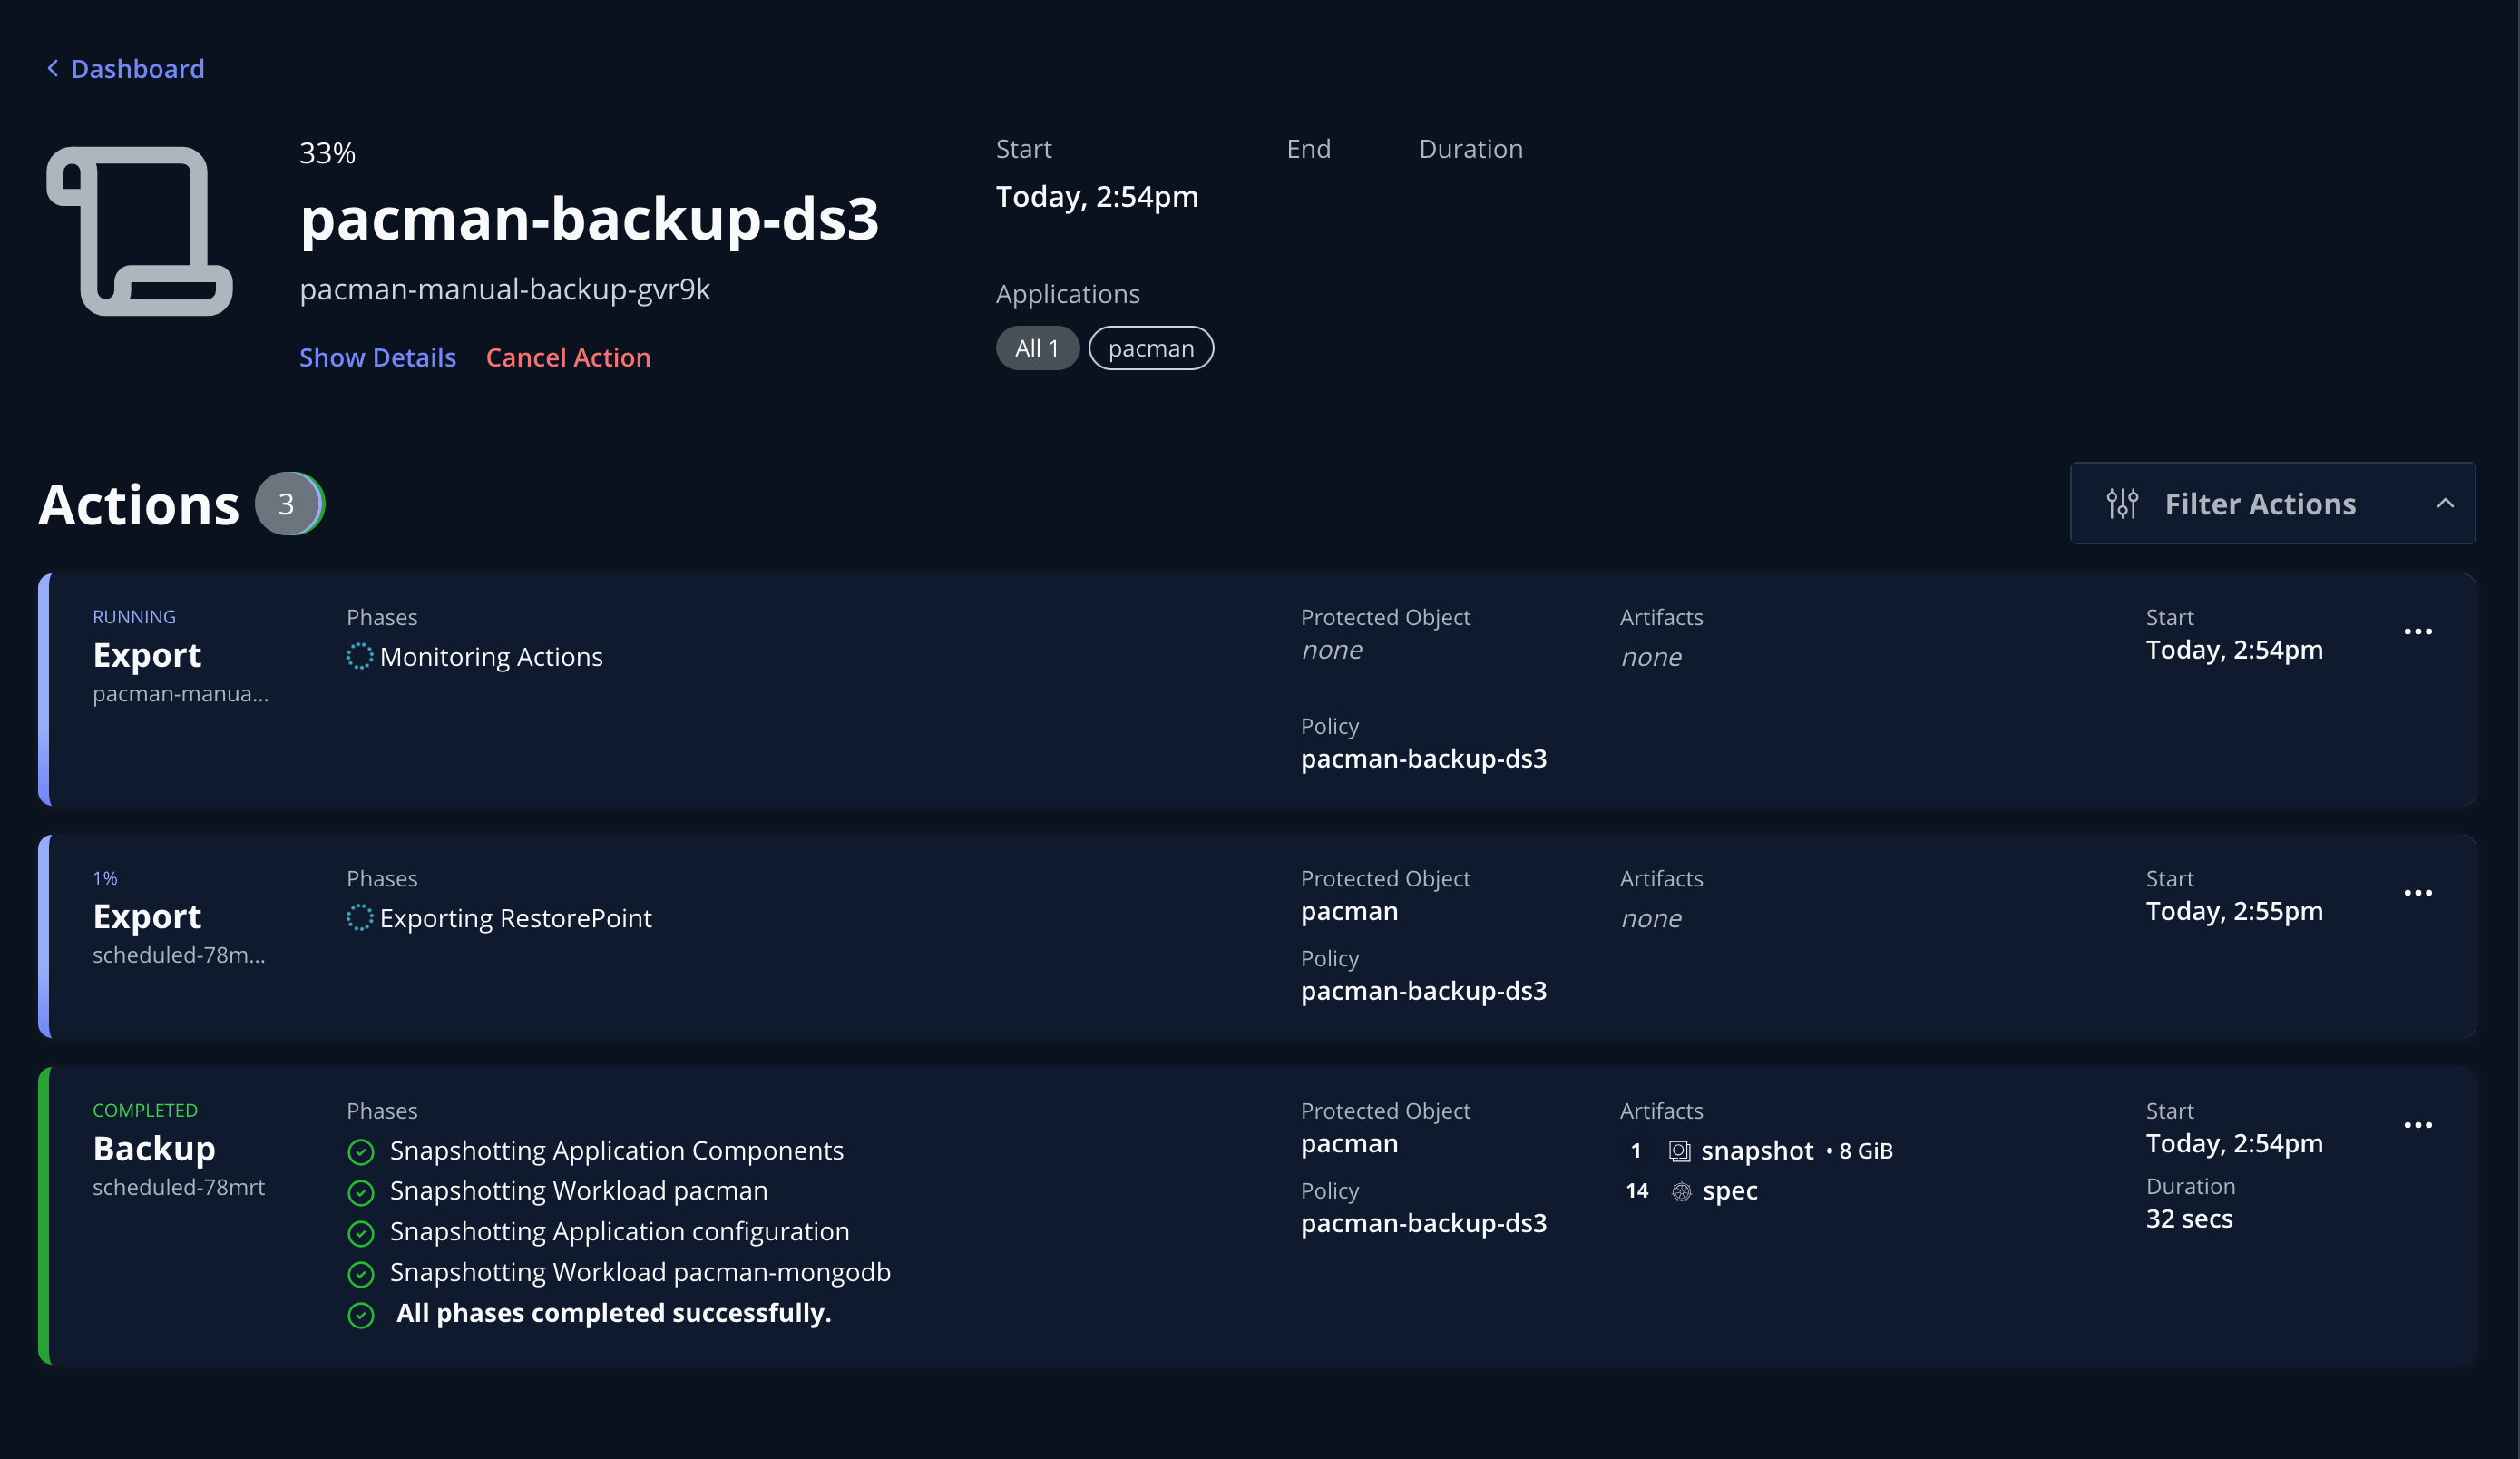
and see it is in Running state:

This is confirmed by checking the UI:
After a while the policy run should complete successfully and – again – this can be verified:

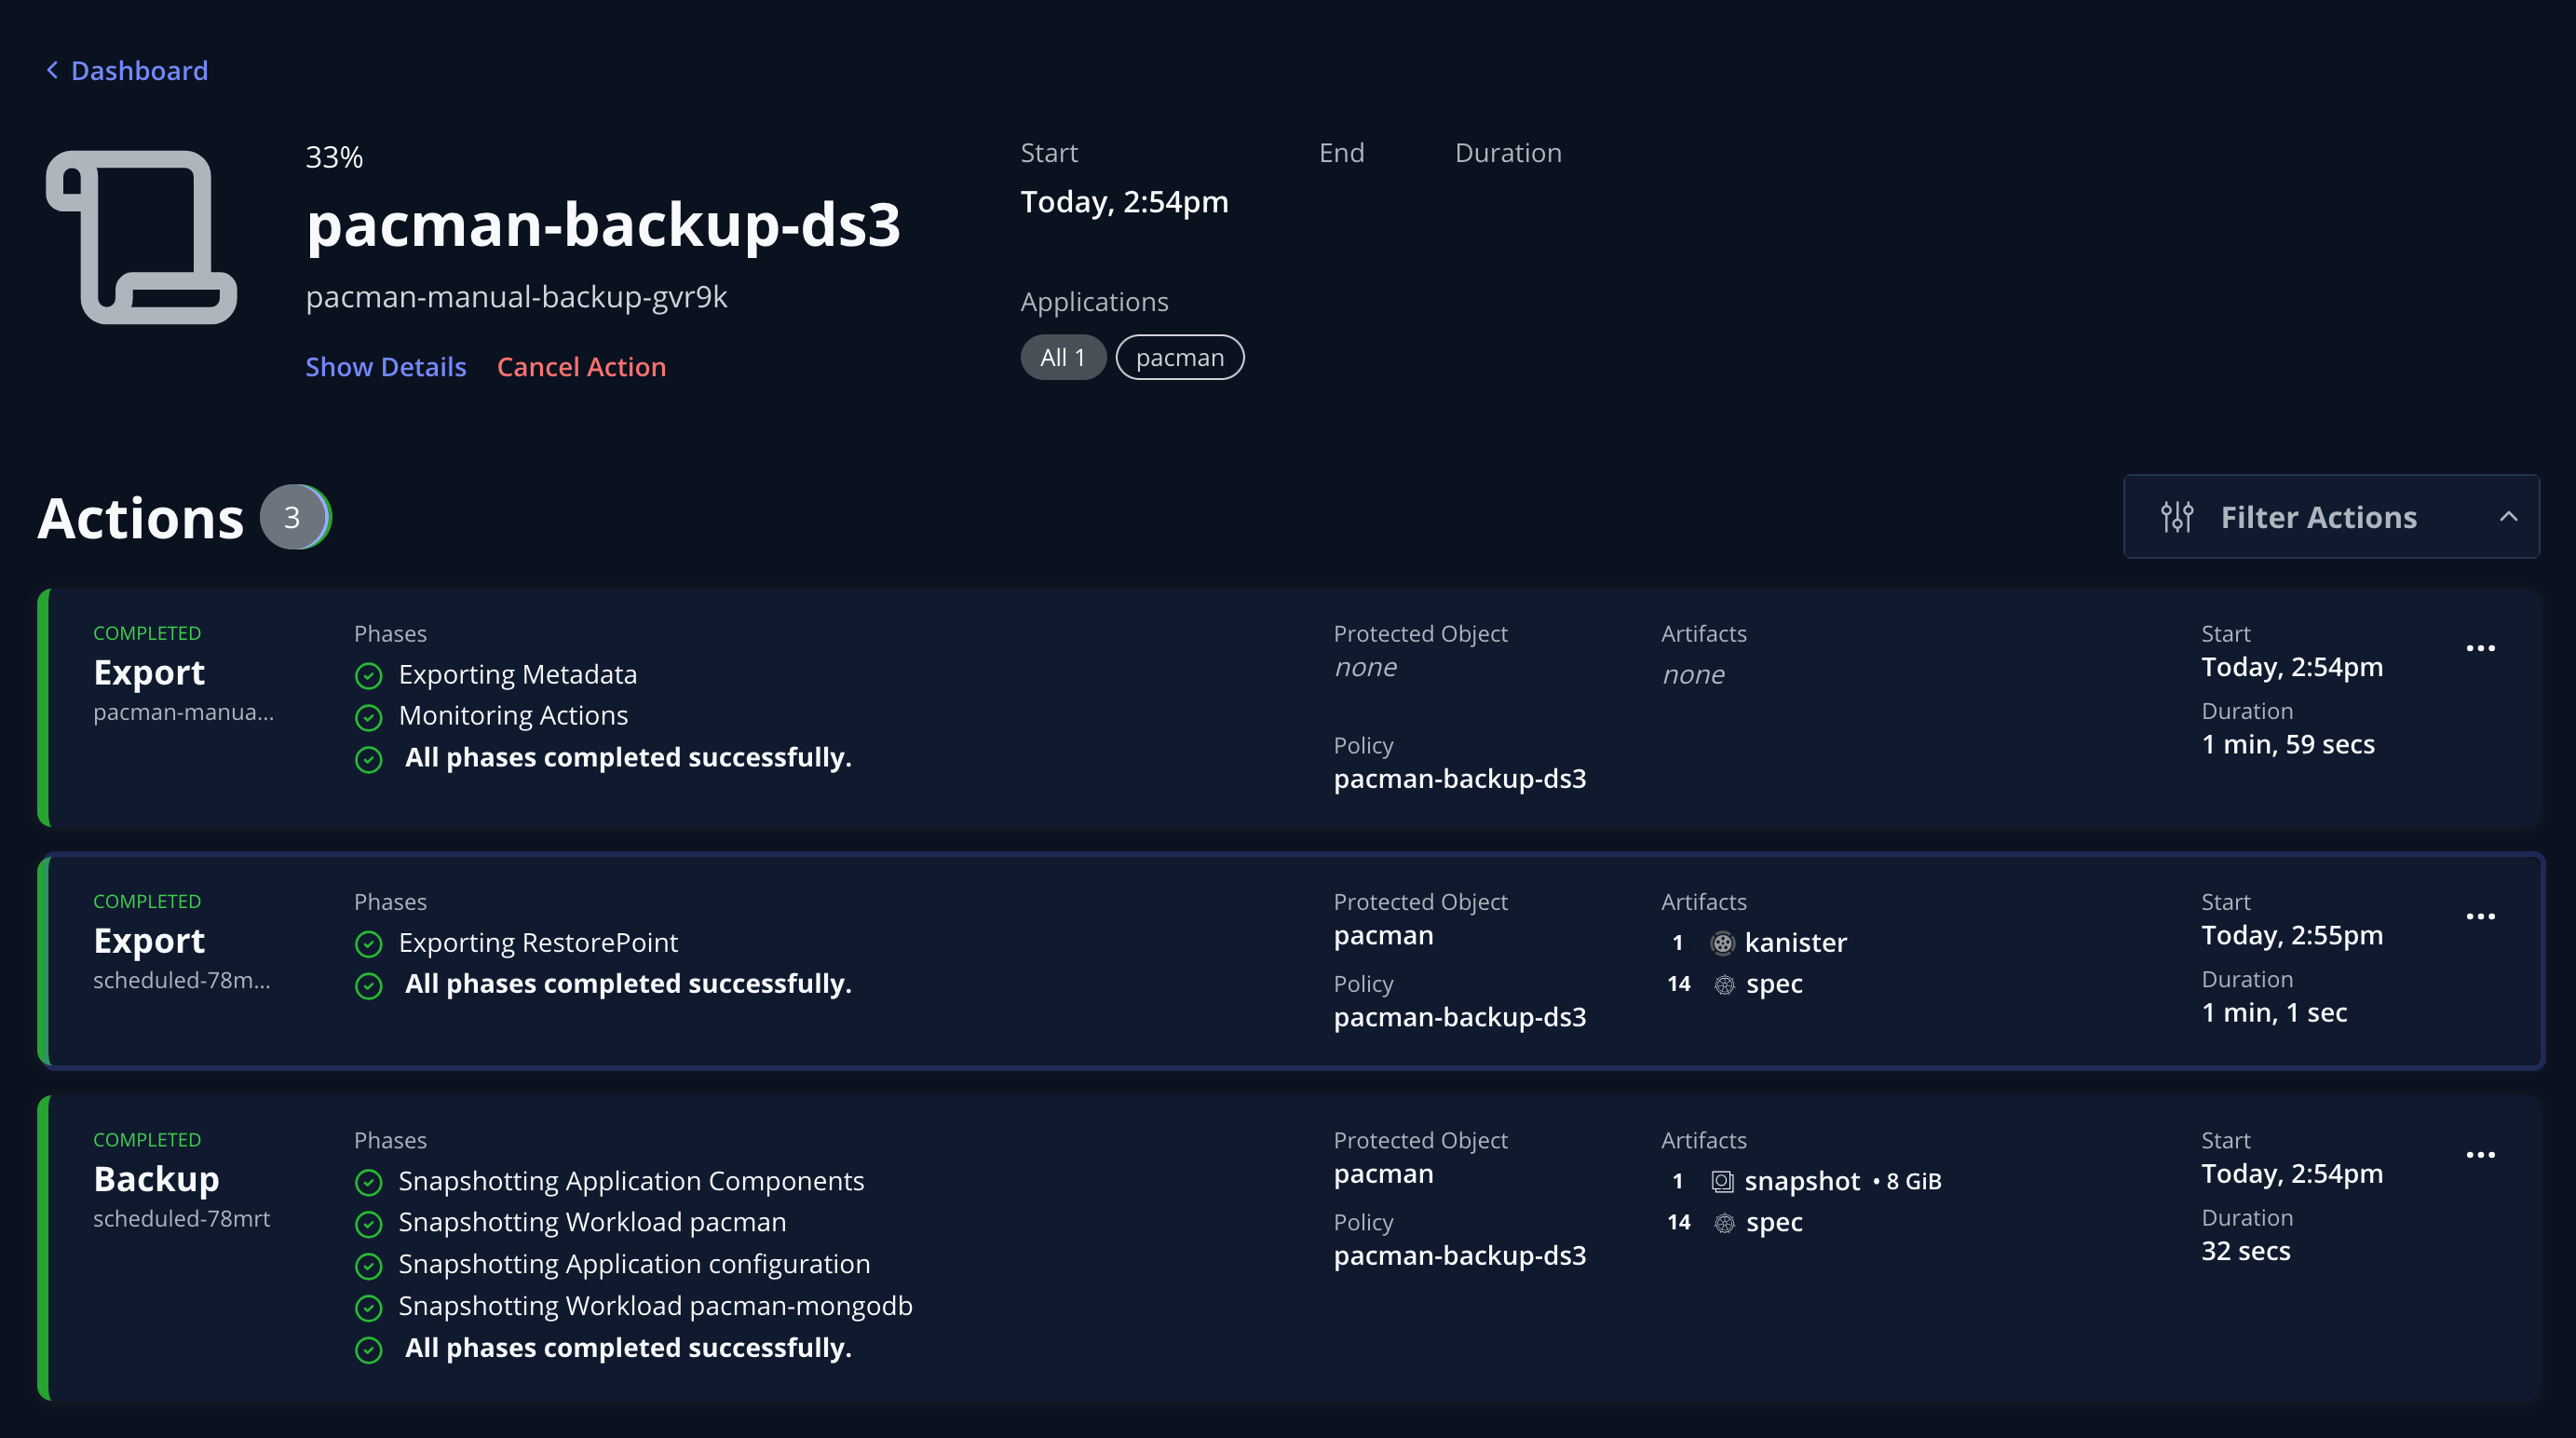
The recently completed RunAction is added to the list of actions performed:
So, now that we have executed a “click-less backup”, can we also restore the same way? Yes, of course.
Restoring your application with kubectl
To be able to restore an application from the command line, we first must identify a usable restore point.
To do that, run the below command, specifying the namespace where the app resides:
$ kubectl get restorepoints.apps.kio.kasten.io -n <app-namespace>
You could see that for each restore point, there is usually two entries, the one with the shorter string refers to the local snapshot while the second, if present, represents the corresponding exported copy:

But what if the namespace had been deleted? We must distinguish between two kinds of Kasten Custom Resources: RestorePoints and RestorePointContents. RestorePoints are the “containers” for RestorePointContents and exist within the application namespace, while RestorePointContents represent the “content” of a restorable backup, and are not namespaced resources but, indeed, cluster-scoped ones.
So, if our app namespace had been deleted, we would have to identify the unbound RestorePointContent we want to restore from, re-create the lost namespace and finally create a new RestorePoint in this re-created namespace, pointing at the orphaned RestorePointContent.
Let’s assume then our namespace had been accidentally deleted. To browse the available RPCs, use the command:
$ kubectl get restorepointcontents.apps.kio.kasten.io

In theory we could restore from any of the two RPCs but the restorability from the local snapshot – the one with the shorter name – is not always guaranteed because the storage snapshot associated to it might not be available anymore, depending on how the storage backend deals with them or the kind of “disaster” occurred. So, unless we are 100% sure we have a valid storage snapshot to recover from, it is always advisable to restore from the export to avoid any errors.
Before binding the orphaned RPC to a new RestorePoint, we must re-create the namespace:

Let’s now create the new RestorePoint object, linking it to the RPC matching the export. Once again, the YAML structure is very simple and self-expanatory:
apiVersion: apps.kio.kasten.io/v1alpha1
kind: RestorePoint
metadata:
  name: pacman-restore-point
  namespace: pacman
spec:
  restorePointContentRef:
    name: pacman-scheduled-78mrt7qwjh
Let’s create the RestorePoint:
$ kubectl create -f <RestorePoint Manifest File>
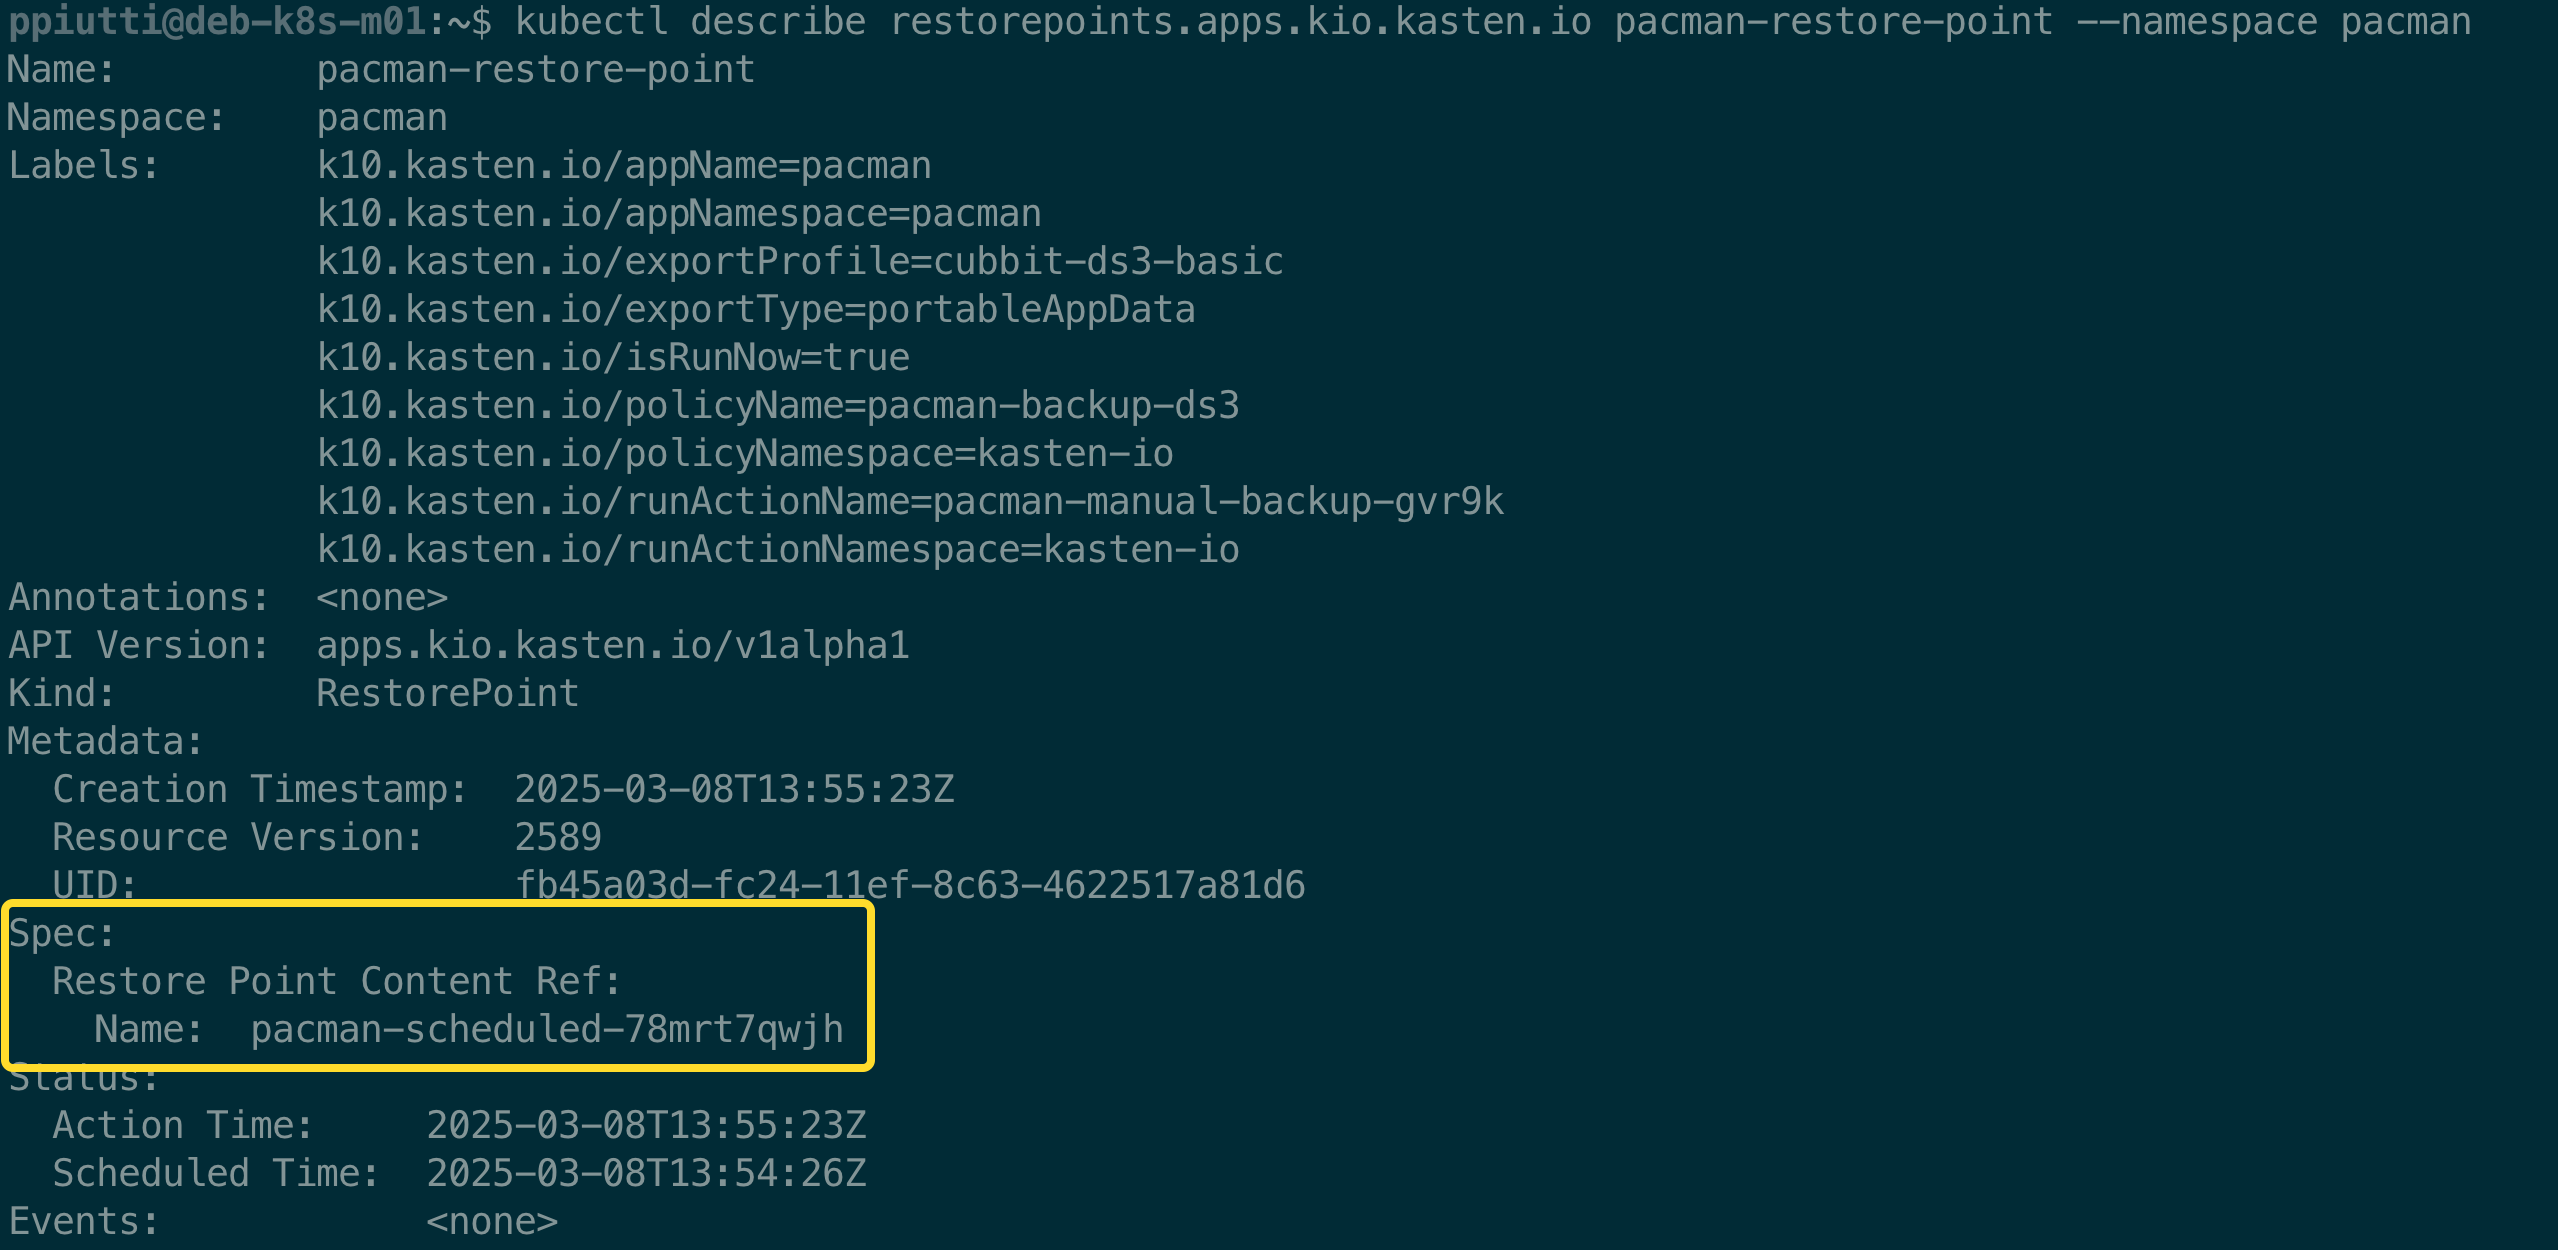
and verify that it is correctly bound to the right RPC:
$ kubectl describe restorepoints.apps.kio.kasten.io \
<RestorePointName> --namespace <Namespace>

We are now ready to restore – to do this we need to create and execute a RestoreAction pointed at the restore point we just created, specified in the .spec.name field:
apiVersion: actions.kio.kasten.io/v1alpha1
kind: RestoreAction
metadata:
  generateName: restore-pacman-
  namespace: pacman
spec:
  subject:
    kind: RestorePoint
    name: pacman-restore-point
    namespace: pacman
  targetNamespace: pacman
Once again, the structure of the manifest is self-explanatory. The .spec.targetNamespace value is useful if we want to restore to a different namespace. In this case we are restoring to the namespace we re-created before, matching name of the lost one.
Apply the manifest and monitor the advancement of the restore process with the command:
$ kubectl get -n <namespace> restoreaction <restoreactionname> \
-ojsonpath="{.status.state}{'\n'}"

The RestoreAction can be monitored also from the UI:

After a few minutes the restore should have completed successfully:


The RestoreAction is correctly logged as completed for the destination namespace

Conclusions
We have learned that Kasten can be operated from the command line instead of the Web UI, enabling integration with GitOps approaches. To demonstrate this, we performed an end-to-end backup and restore workflow through kubectl, without using the web interface.
We learned how to create Location Profiles, Backup Policies and trigger them with Run Actions. Finally, we Restored a lost application. In the process we learned how to check BackupActions, ExportActions and RestoreActions and how to work with RestorePoints and RestorePointsContents.
In future blogposts, we’ll dig deeper and learn how to perform Disaster Recovery workflows from the command line – stay tuned for more content!


